Are you a portrait photographer looking for the perfect studio lights setup? With the right equipment and knowledge, you can create stunning photos that will make your clients happy. In this article, we'll explore the basics of studio lights setup for portrait photography, the types of lighting available, and how to find the best setup for your studio. We'll also discuss the importance of balancing your lighting to ensure that your photos look their best. Whether you're just starting out with portrait photography or a seasoned professional, having a good understanding of studio lights setup is essential. With the right setup, you can take beautiful portraits in no time!Studio lights come in a variety of shapes, sizes, and colors, so it's important to choose the right equipment for your needs.
Consider the size of your space, the size of your subject, and the desired effect you're trying to achieve. Once you've chosen the right equipment, it's time to set it up. This includes positioning the lights in the right place and angle so they provide even illumination. You may also want to adjust the power of each light, as well as adding filters or modifiers to soften or add color.
Finally, you'll need to adjust the camera settings and focus on your subject for the best results. It's also important to be aware of any potential safety risks when working with studio lights. When setting up studio lights for portrait photography, it's important to consider the size of your subject and the type of effect you're looking to achieve. For example, if you're photographing a full-length portrait, you'll need more powerful lights than if you were just shooting a headshot.
The number of lights you need will also depend on the size of your space and the type of lighting you want to create. A three-light setup is usually ideal for portrait photography, but you can also get creative with one or two lights. Once you've chosen the right equipment for your needs, it's time to set it up. When setting up multiple lights, make sure they are not too close together or too far apart. If you're using a diffuser, make sure it is placed correctly between the light and your subject.
When adjusting each light, think about the intensity and angle of each light source. You may need to adjust the power of each light if you're shooting in a small space or shooting a small subject. You can also add color filters and modifiers to soften or add color to your images. When shooting in manual mode, pay attention to shutter speed, aperture, and ISO settings.
Try different combinations until you get the desired result. Remember to check your images frequently as you adjust the settings. It's also important to be aware of any potential safety risks when working with studio lights. Make sure all cords are safely tucked away from any high traffic areas and that all lights are securely mounted. Additionally, be sure to wear protective eyewear when working with studio lights.
Adjusting Camera Settings
To get the best results from studio lighting, you'll need to adjust the camera settings.Start by focusing on your subject and setting the exposure on the camera. You can adjust the shutter speed, ISO, and aperture to get the desired effect. Make sure to consider any potential safety risks when working with studio lights, such as electric shock or fire hazards. Additionally, you may want to experiment with different lighting angles and distances in order to achieve the desired effect.
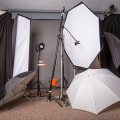
Setting Up Studio Lights
Once you have chosen the right equipment, setting up studio lights correctly is key.This involves positioning the lights in the right place and angle so they provide even illumination. You may also need to adjust their power and add filters or modifiers to soften or add color. When positioning the lights, it is important to consider the size of the subject and the lighting effect you want to achieve. If you are photographing a full-body portrait, you may need to use more than one light source.
Place the lights at different angles and distances to create shadows, highlights, and depth. You can also use different light modifiers to create different lighting effects. These include umbrellas, softboxes, snoots, flags, and gels. Each modifier offers a different type of light, so experiment to find the look you prefer. Finally, you may need to adjust the power of each light source to create a balanced exposure. Adjusting the power levels allows you to control the brightness of each light and achieve the desired effect.
Choosing Studio Lights
When choosing studio lights for portrait photography, it's important to consider the size of your space, the size of your subject, and the desired effect you're trying to achieve.Different types of studio lights offer different features, so make sure you understand what each one can do before making a purchase. One of the most important factors to consider is the size of your space. If you're shooting in a small space, you'll want to opt for smaller, less powerful lights that won't overwhelm the room. On the other hand, if you're working in a larger space, you may want to consider more powerful studio lights that will allow you to create dramatic lighting effects. The size of your subject is also an important factor. If you're shooting a small subject like a baby or pet, you'll need a light that will cover the entire area without being too bright or harsh.
For larger subjects, such as adults, you'll need more powerful lights that can reach farther distances. Finally, you'll want to consider the desired effect you're trying to achieve. Are you looking for a soft, natural look or something more dramatic? Different studio lights offer different features, so make sure you understand what each one can do before making a purchase. Using studio lights for portrait photography can be intimidating, but with the right setup and camera settings you can create stunning results. Choosing the right studio lights for your needs is essential, as is setting them up correctly. Once you have your lights in place, adjust your camera settings to get the best results.
With practice and some trial and error, you'll soon be taking beautiful portraits with studio lights.